Table of Contents
This is an old revision of the document!

REF: Service Procedures 11I
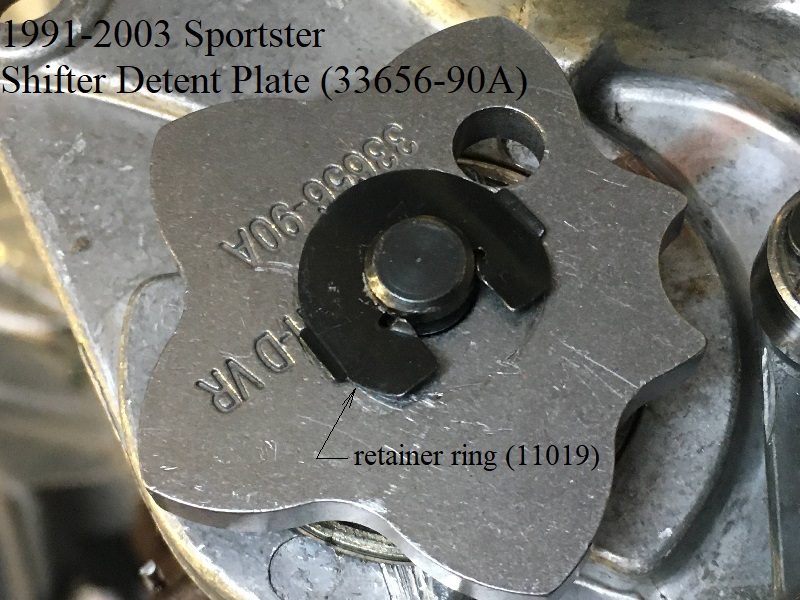
1991-2003 Shifter Detent Plate Retaining Ring Alternatives
Finding a retaining ring / circlip that fits the shaft groove in front of the detent plate is not easy.
Standard retainer rings are usually in mind when grooves and shaft ODs for the groove are machined for retainers.
See also Retaining Ring Sizing Charts in the REF section of the Sportsterpedia.
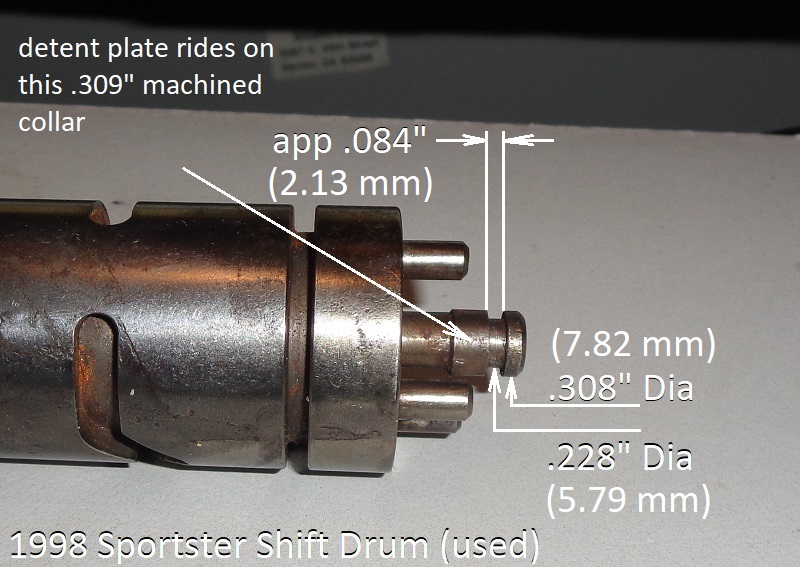
The OEM shaft groove depth, width and the shaft OD on the end are all made specifically to specs for the flexible retainer clip.
The groove depth is cut significantly deep to match the specs for the flex clip (app .085“).
So a regular circlip to replace the OEM one will require a washer behind it to take up that space between the circlip and the detent plate.
The groove width is cut wide to allow for the clip to shoulder against the detent plate.
The clip will compress and allow the space to be taken up by the plate during a period of side loading then relax to installed width when sideload is off.
The shaft OD is also ground for the specs of the flex ring (app .228”) and poses a problem when trying to use a regular circlip instead of the flex ring.
If you can find a standard circlip that will fit the groove depth, it won't even be as tall as the shaft.
Replacement OEM clips (11019) can be purchased at HD Dealerships or online.
Replacement clips can also be bought from retainer ring manufacturer outlets, as in a Rotorclip part# (EL-31).
The OEM retainer ring is officially called an (External Bowed Locking Ring).
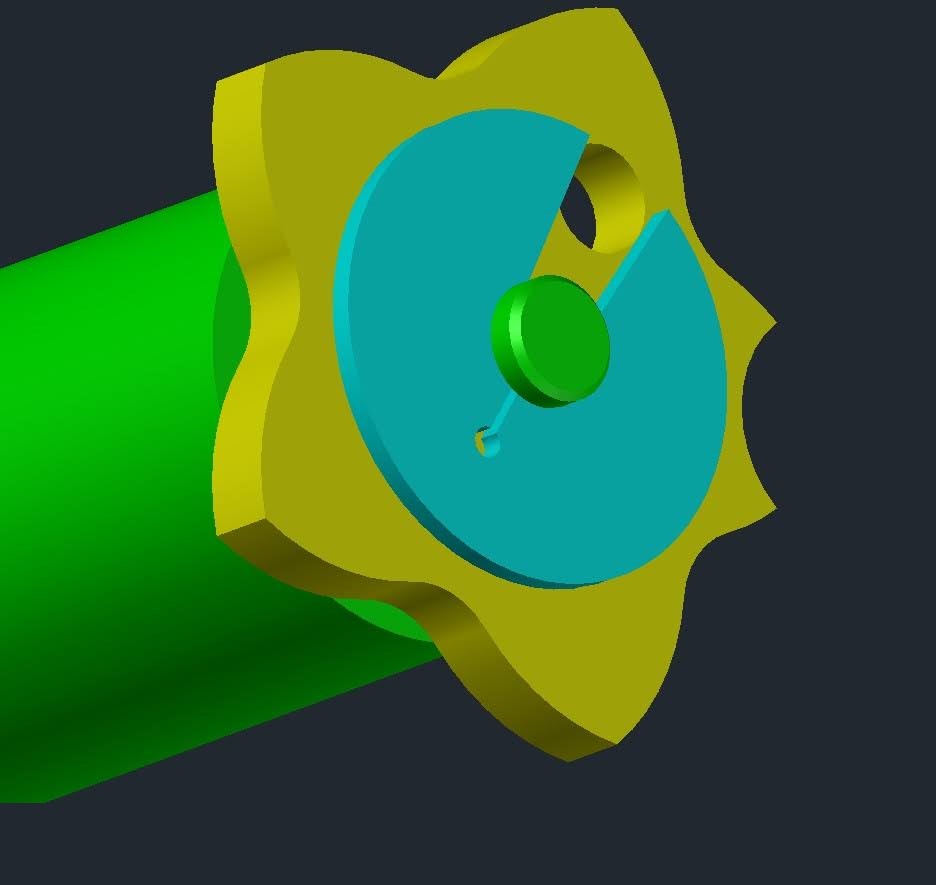
| OEM 91-03 detent plate and retainer ring 1) |
 |
Sizing information for a retainer ring alternative
There are some considerations when trying to spec an alternate retainer for the detent plate.
- Any attempt to tighten the detent plate against the pins can result in transferring the load to and breaking the shift drum shaft end.
Normally the load is “handled” by the flexible OEM clip which softens side pressures against the tip where the clip is installed.
The flexible clip is another one of those pieces that is designed to fail before it's more important counterpart (shaft end) fails.
So keep in mind to check the shaft end with any opportunity given when the primary cover is off. - The groove diameter of the retainer spec needs to be matched to the groove diameter of the shift drum shaft groove.
- The shaft groove OD in the example pic below is .228“ diameter.
- So the relaxed diameter of a potential retainer ring needs to be between .228” and the maximum expanded specs of the retainer manufacturer.
- Any retainer used will need a washer installed against the detent plate to take up the space from the detent to the clip groove.
- The OEM retainer is very thin but also very wide and bowed (angled) toward the detent plate (putting a slight pressure on the detent when installed).
- With the purpose using an alternate retainer being to keep the detent plate from moving, you'll need a washer to take up space.
The washer thickness will be based on the type and thickness of the retainer used.
Generally, stainless steel washers are thinner than carbon steel ones so there are choices in material and thicknesses.
- If you want to use front installed retainer rings, the shaft diameter tolerance range needs to include the shift shaft end OD.
- This is important for round wire rings, spiral rings and C-section rings. These can not be installed from the side.
If the OD of the shaft end is too big for the retainer, you'll over-stress or break the ring trying to open it large enough to go over the shaft.
Alternate retainer Ideas
- Here are a few ideas for alternative retainers. Use these at your own risk as results will vary. See further explanations of these ideas down the page.
- Retainer installed from the side:
- 8.00mm E-clip (use one E-clip and one 5/16“ washer or one 8mm washer thick enough to take up the space between clip and detent plate)
- 5/16” crimped flat washer (“C” cut into washer to clear the groove OD and compressed to the groove w/ 5/16“ or 8mm flat washer behind it)
- Retainer installed from the front:
- 5/16” crimped flat washer (one side cut across face, slid over the shaft and compressed to the groove w/ 5/16“ or 8mm flat washer behind it)
- Threading the end of the shaft for a nut:
- The shaft that is pressed into the center of the shift drum can be resized and threaded with a die to accept a 5mm nut.
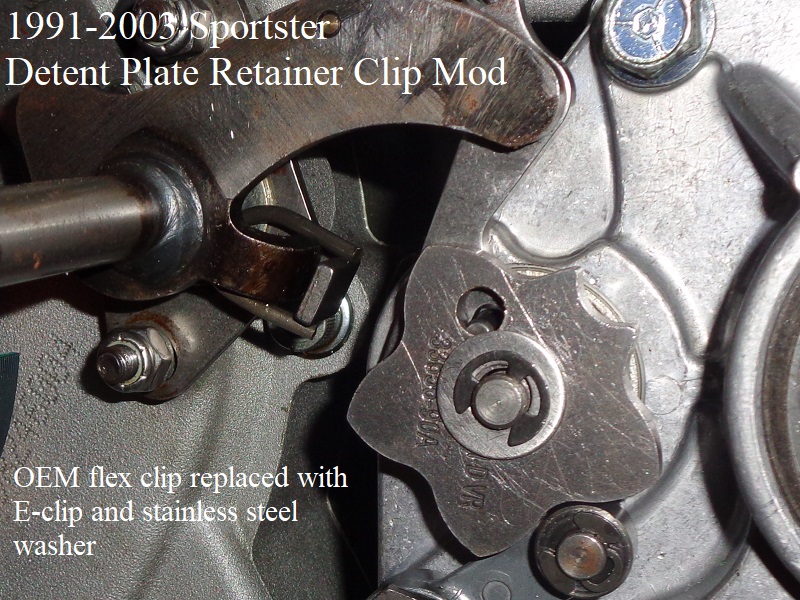
Using a C-clip or E-clip to replace the OEM retainer clip
- Many have suggested to replace the OEM flex clip with a C or E clip with a thin washer behind it.
Just keep in mind, this WILL transfer side load to the tip of the shaft.
That has been known to work but sizing is most important and there are no C or E clips that spec'd for the shifter shaft groove.
You won't find many (unless one offs) that are in the correct size specs for the shaft (again cut for the flex clip specs).
Note: Pre-sizing (crimping down to size) a retainer clip is a good way to cause it to fail.
To pre-size a clip, you must crimp it vertically (squeezing it sideways only allows it to spread out on install). - A 8.00mm E-clip is the closest to spec for the shift drum groove.
Ring ID (5.26mm relaxed) - Groove OD (5.79mm), Ring OD (11.75mm) - Shaft Dia (3.08mm)
So it will have a light interference fit and plenty of height to hold a washer against the detent plate.
An 8mm E-clip is designed for a (6.0mm) groove to make it as tight against the groove as it was designed to be.
So you might consider “slightly” crimping it down before installing to get a tighter fit on the shaft. - The closest match (SAE) E-clips are not close enough.
A 5/16” E-clip is the closest over-match for the shaft groove OD (E-clip .250“, shaft groove .228”).
So you'll need to crimp the E-clip down (.20“) to reduce it's ID before installing it which could stress or break the clip.
A 1/4” E-clip is the closest under-match for the shaft groove OD (E-clip ID .207“ relaxed, shaft groove .228”).
So you'll need to stretch the clip a minimum of (.021“) just to get it over the groove which could stress or break the clip.
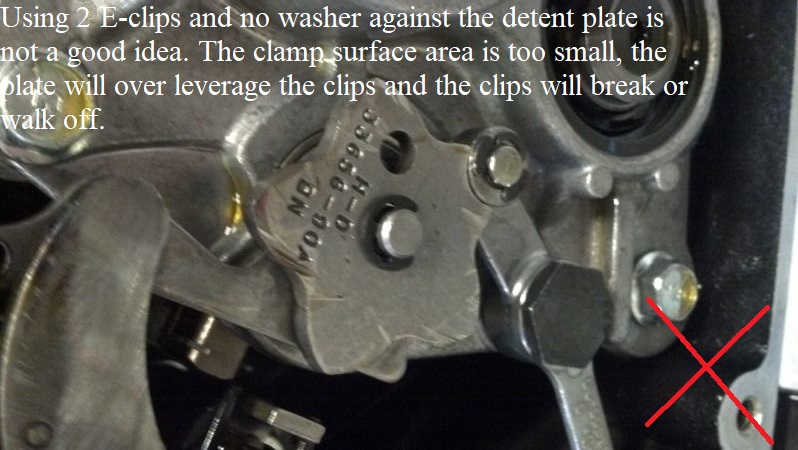
Just because a clip goes on without falling off does not mean it will stay on. - Using a washer behind any retainer clip other than OEM is crucial due to the groove width.
The machined area where the detent plate sits is slightly longer than the detent plate and about (.309”) in diameter.
So a 5/16“ washer will be needed to slide on / half on that shelf and against the detent plate.
An 8mm washer will also work as it just slightly bigger ID than the 5/16” washer.
A washer added takes up that leftover width and keeps the retainer clip pressed against the detent plate thru the washer.
A C-clip is not as stable to use as an E-clip therefore an E-clip is the better choice between these two types of retainers.
In fact, many have used an E-clip and haven't had any problems using one or having one come loose (no reports of that anyway).
But many have also had them come off.
So it is not a given that it will stay on even though there are those that have never have an E-clip fall off, it's not for certain. - There is a down side to using a C or E clip.
What you'll be doing is making a normally flexible joint into a rigid joint.
C or E CLIPS ARE NOT DESIGNED FOR BIG SIDE LOADS. The problem with that is the open space on one end.
These type retainers are installed from the side with one end open to expand around the groove thru a certain designed expanding range of the metal.- The first possible problem using an E-clip is it's ID.
You need to measure the groove to match the clip specs and different shafts may have different groove IDs due to quality control or normal wear.
If you use a size too small or even “just” too small, you can break the retainer while installing it (expanded too much).
If the retainer doesn't break but stresses too much while installing, it can break or expand too much under heat and fall off.
If the ID is too large, you'll have to squeeze it down tight against the groove which can stress or break the clip (now or later). - The second possible problem using an E-clip is the open end itself.
When you add the washer and install the E-clip, you will probably have a tight fit now with the detent plate (no wobble).
But if the shift pawl or shift drum pin(s) thrust hard enough against the detent, that puts more pressure against the E-clip.
Also, if a shift drum gets in the condition to move, the pawl will push it hard into only one side of the detent plate/E-clip.
This is the same scenario as with the OEM flex clip.
But without the ability to allow axial movement using an E-clip, pressure can slightly turn or twist the plate and the E-clip away from it's groove.
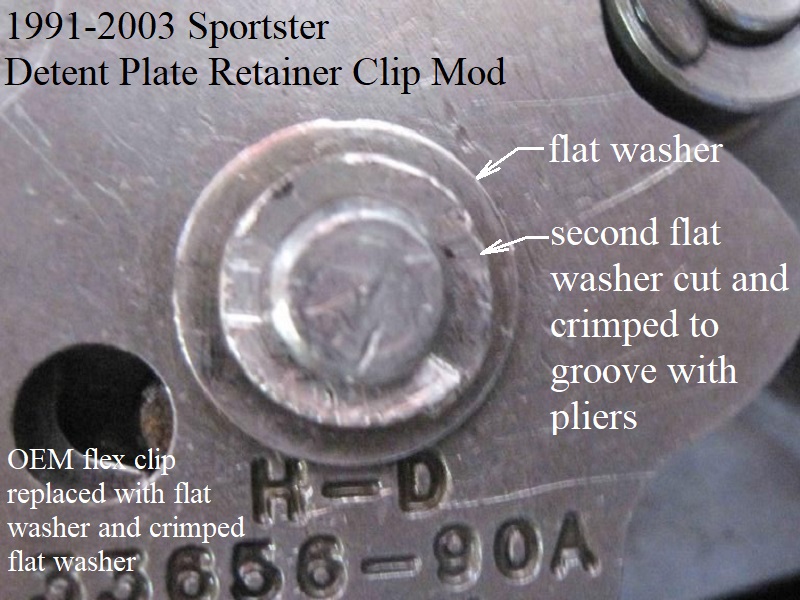
Using a crimped flat washer to replace the OEM retainer clip
- You can install a thin flat washer and “crimp” a standard flat washer on the outside into and against the shaft groove (tight against the washer also).
Just keep in my mind this WILL transfer side load to the tip of the shaft.
A pair of pliers can be used to make the crimp.
All you need to do is make a cut across one side of the washer, slip it over the shaft and crimp it tight to the shaft groove.
(squeeze the two ends until they overlap each other into the shaft groove and becomes tight)
It may be best to use a grade 5 washer as it should bend before breaking and a grade 8 is more brittle.
The breaking point from hardness is important since you'll need to bend the ends without too much stress in the afterwards.
This will make the detent plate a rigid point of contact.
Due to hardware quality control, you may have to check sizes on several washers before doing the crimping to be sure of a tight fit.
The stock fit is a loose fit with the flex clip on the end.
A rigid clip here will keep the detent plate from leaning. But it won't keep the pins from being pulled on by the shift pawl.
If a pin is in the “condition” to move freely (as described above), the pawl will still grab the pin and thrust it into the detent plate.
Just as with the OEM parts, the pin will try to lean the detent plate.
With the now rigid retainer on the end, the plate cannot move. However, it may be possible to either warp the plate or pressure the tip of the shaft.
The flex clip takes sideload (pressure) away from the shaft end. A rigid retainer will put the sideload on the shaft end. - There is a down side to using this type of retainer.
This method works but will be a bear if you have to remove it. 4)
And any time you cross the legs on a flat washer it is no longer flat all the way around.
There will be a small amount of space on the back of one side that does not touch the spacer washer in the rear.
This is THE main reason there is so much slop in the shifter shaft, but not the only reason.
If side load is hard enough, it'll still push the detent plate into the space that is created by crimping a flat washer.
So this method is a good fix if wanting to tighten the detent plate against the pins but may not be a complete end to the leaning of the plate.
That depends entirely on the strength of the thin washer next to the plate not bowing in at the point where the crimped washer coils away it.
| Crimped flat washer mod 5) |
 |
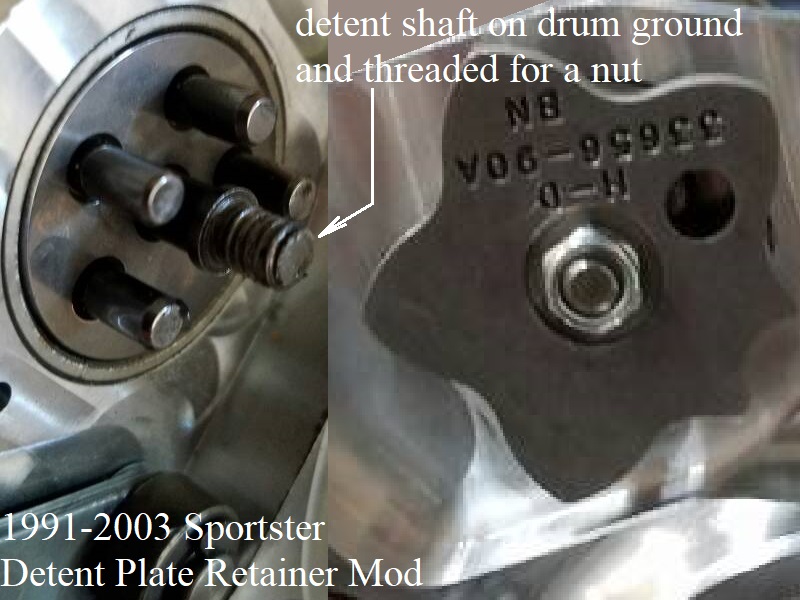
Threading the end of the shift drum for a nut
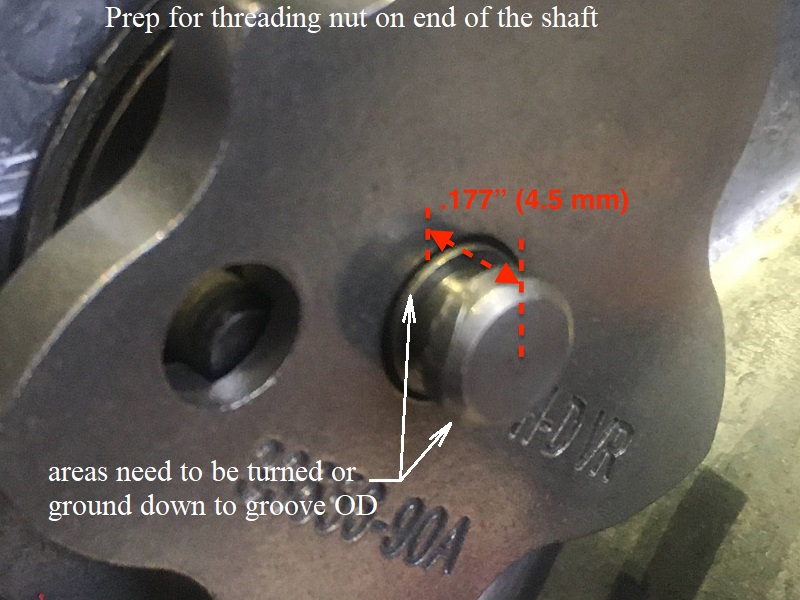
It is possible to grind the shaft end (where the retainer ring groove is) down to the correct size to cut threads with a die for a nut.
Just keep in mind, this WILL transfer side load onto the shaft itself and in the shear plane of the shaft threads.
The shift shaft itself is hardened but the detent sits on a non-hardened shaft inserted in the end of it.
XLF member MatHormell had his threaded for a nut as shown in the pics below.
The shaft's retainer ring groove is app .228“ (5.8 mm).
And the length from the detent plate (where it should normally and properly sit) to the shaft tip is app .177” (4.5 mm).
That length gives the dimension of the max nut length you can use without altering the nut or using a special nut.
Should you want to use a washer too, just add a shorter nut or cut one down to length.
Nylocks are probably a good idea if you would have the room to help keep the nut from backing off, with Loctite added also.
But Nylocks can not be shortened on the outer side and retain the nylon insert on the end.
- Deciding what size nut can be used.
Once the shaft has been ground to one diameter the distance from the tip to the projected plate's face, the OD left over determines max thread size available.
Also, reducing the size of a rod you want to thread with a die makes it easier to start the die.
But the real secret is to add a 30° chamfer to the end of the rod (shaft) before using the die. 6)
Die blank size (shaft dia needed) is the major diameter less 10% of the thread pitch. This is about the same as common bolts.
The groove diameter on the shaft is .228“ which is the biggest diameter that can be used for cutting threads.- M5 threads would require the shaft to be sized to (4.92 mm) or (.1937”) dia. before threading ending with a minor diameter of (4.2mm) or (.1582“).
- The following thread sizes or larger require a shaft diameter (die blank dia) bigger than possible to cut the threads and will not work.
While the minor thread diameter may be fine, the major thread diameters of the shaft and nut will not meet properly.
The nut may thread on afterwards but proper torque will not be possible without stripping the threads and/or loosening of the nut during operation.
(residual thread depth too short)- M6 threads would require the shaft to be sized to (5.90 mm) or (.2322”) dia. before threading.
- 1/4“x20 UNC threads would require the shaft to sized to (.2450”) or (6.223mm) dia. before threading.
- Sizing the shaft.
- The front portion of the collar that the detent plate sits on and the tip of the shaft will need to be cut / ground to the groove OD.
The then the entire of the shaft from tip to detent plate will need to be turned down to the proper (pre tap) size for the die.
In this case, to use a 5mm nut, the shaft will need to be turned down to (4.92 mm) or (.1937“) on a lathe.
If you have a lathe or access to one, just chuck the drum up and turn it down.
Or you can take the drum to a local machine shop and have them turn it down.
Certain type retainer clips are useless for this application
- A Round Wire Snap Ring will not work:
- You can find a (.221“ relaxed ID) Round Wire Snap Ring ( Click here for link ) at arconring.com
The groove ID spec is (.228”-.231“, fits shaft groove) but the shaft diameter spec is only (.250”) so it won't go over the (.308“) OD shaft without ruining the ring.
The ring height is only (.022”) and even if you could get it over the shaft end, it would sink into the groove below the OD of the shaft.
The ring height (.022“) is smaller than the groove height on the shaft (.308” - .228“ = .080”).
- A Spirolox Retainer Ring will not work:
- You can find a WSM-25 (.228“ +.000”/-.010“ relaxed ID) Extra Heavy Spirolox Ring ( Click here for link ) at Smalley.com
Spirolox retainers are widely known for retaining piston wrist pins on older Sportsters.
The groove ID spec is (.230” +/-.002“, may fit loose against groove) and the shaft diameter spec is only (.250”) so it won't go over the (.308“) OD shaft without ruining the ring.
The ring height (.020” +.003“/-.005”) and even if you could get it over the shaft end, it would sink into the groove below the OD of the shaft.
The ring height (.023“ max) is smaller than the groove height on the shaft; .308” - .228“ = (.080”).
- A standard Circlip will not work:
- Forget about the groove size or shaft diameter of an SAE or Metric circlip, neither internal or external.
No standard circlip will be tall enough to rise above the shaft (groove height too big) and will not keep a washer or the detent plate from sliding off the drum shaft.
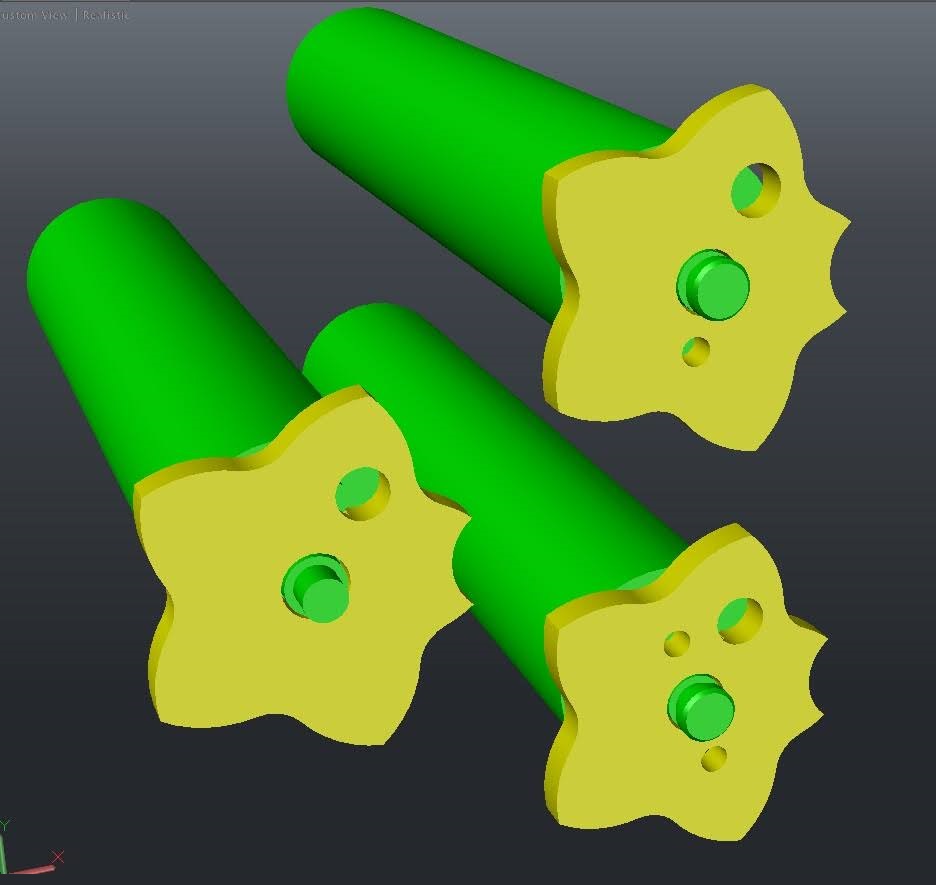
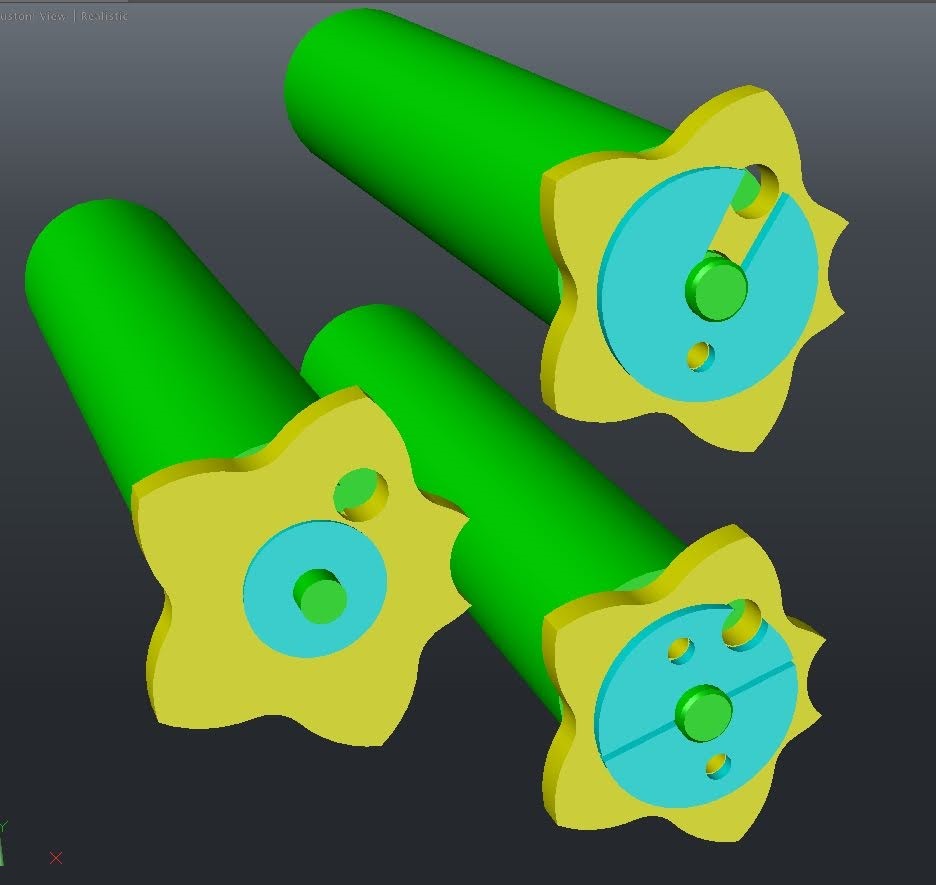
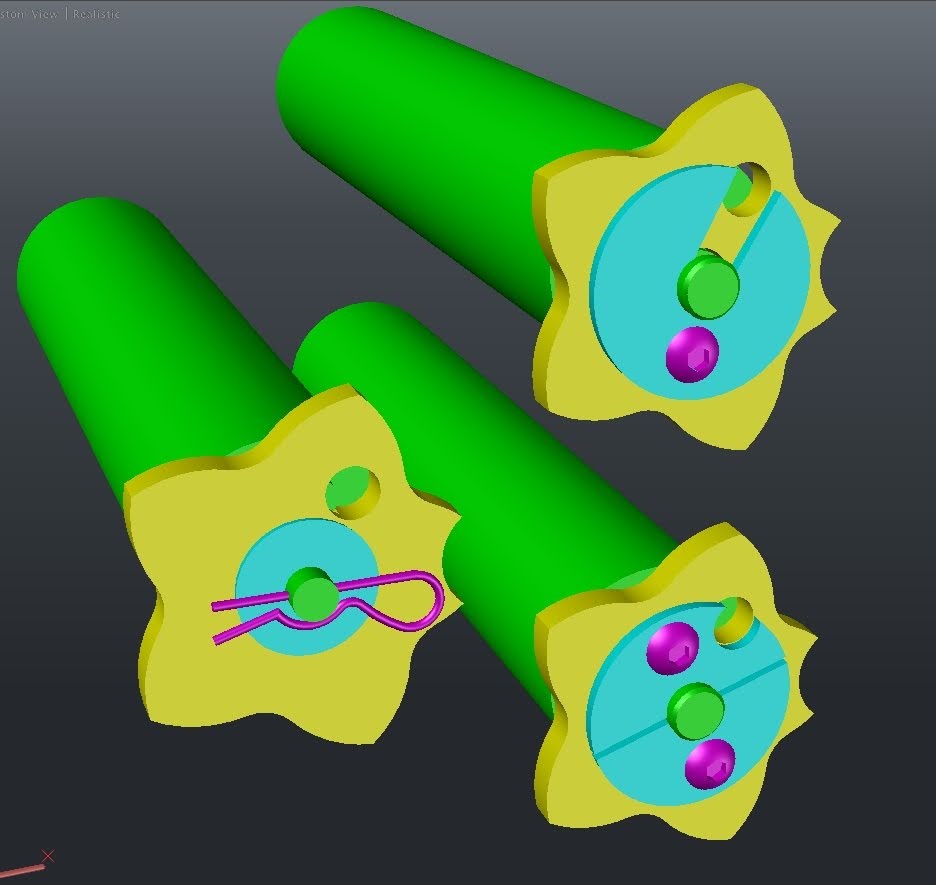
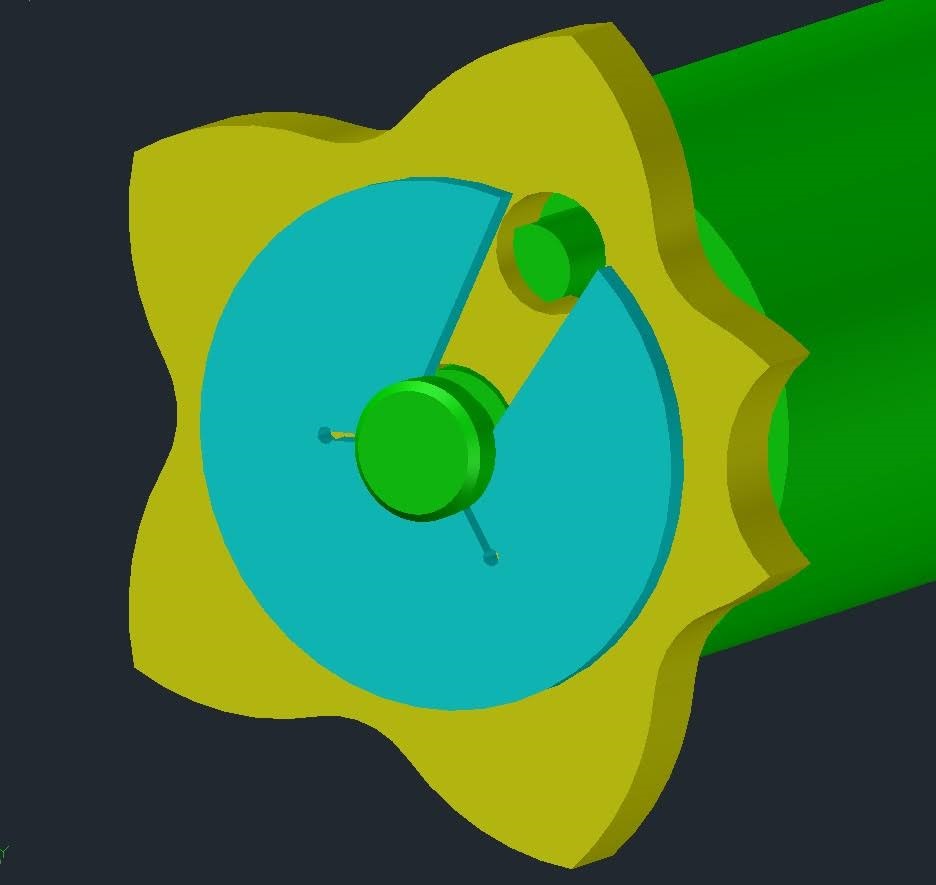
Build your own retainer
Click on any drawing to enlarge.
Below are some patterns for a custom retainer for the detent plate by xLoneRiderx for those with a creative mind and good machinist abilities. 10)
Retainers made from a standard steel washer 6 mm ID, 30 mm OD and 1.5 mm thick.
The retainer is assembled to the detent plate through one or two M3 x 5 mm button head screws (in magenta color) below.
 |  |  |
 | 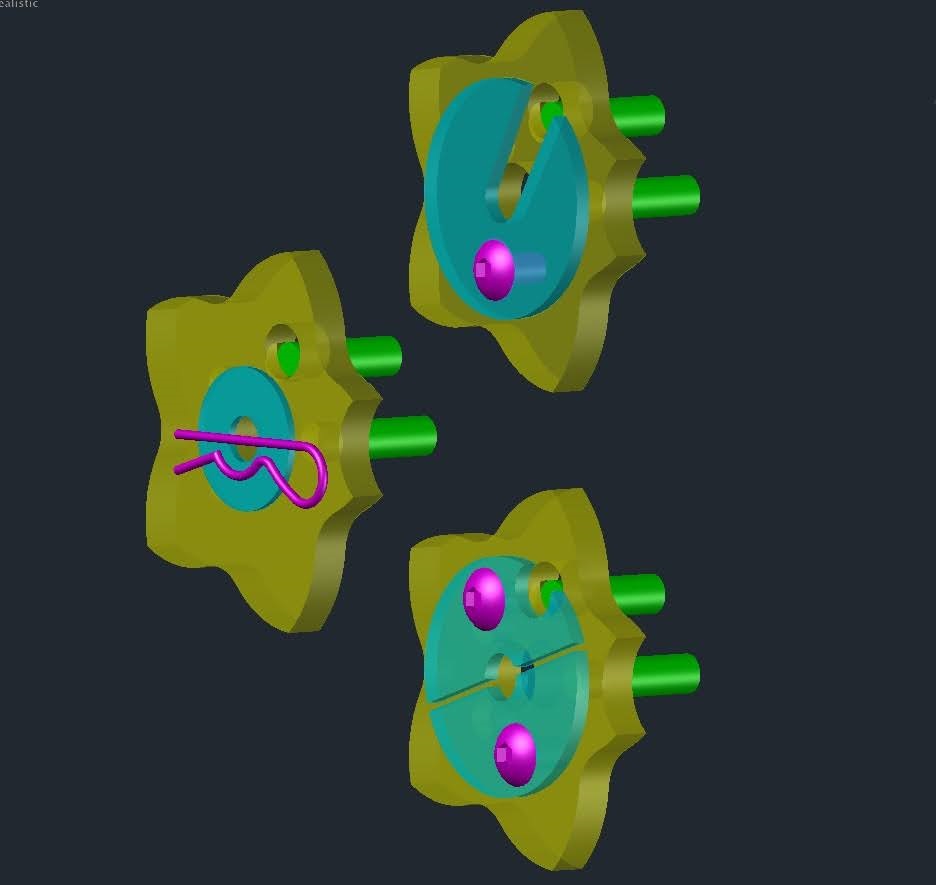 |  |
These are made from the same steel washer and with one or two slim cuts that end in a 2 mm drilled hole.
These convert the washer into a solid and elegant “E clip” that will support the drum pins \ detent plate assembly in place.
These cad model solutions may help support the stock pressed pin assembly.
 |  |  |
 |  |  |