Table of Contents

EVO: Oiling & Lubrication - Sub-01Q
Oil Pressure Switch Removal and Installation
Installation
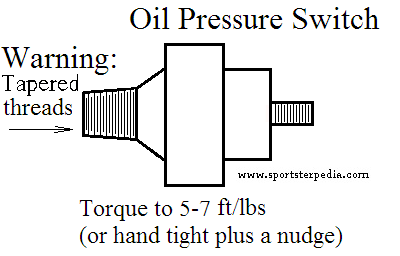
Caution: DO NOT tighten the oil pressure switch too tight.
It will either strip the threads in the filter housing or crack the filter housing.
If you don't have access to a torque wrench or can't get one to fit in there, use a “hand tight plus a little” approach when tightening the switch.
You can also clamp a nut in a vise if needed, install a bolt and tighten it to 5-7 ft/lbs.
Then use a open/box end wrench to feel the point where it turns.
Then you have a bench mark 'feel' for how tight to turn the pressure switch with the same type wrench.
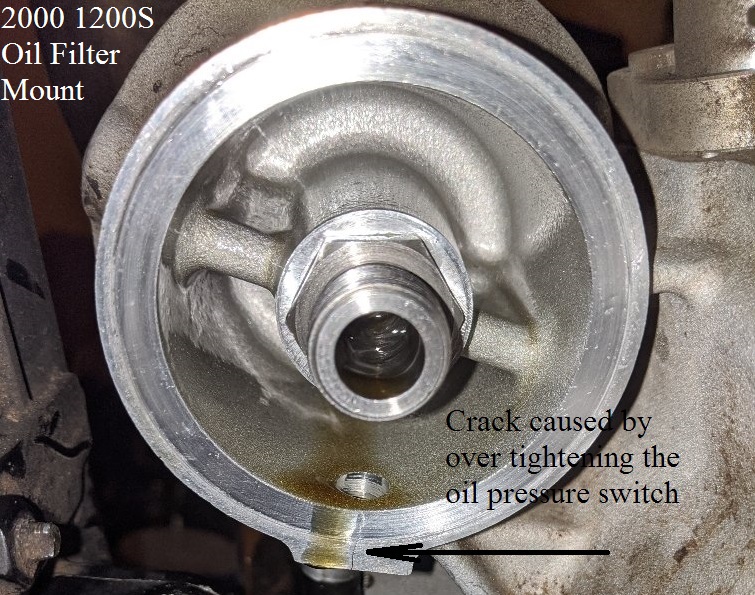
This one got tightened too much and cracked the filter housing.
Don't over tighten to try and stop a leak. It doesn't take much oomph to seal the pressure switch.
Don't use silicone on the threads. Thread tape may break off and enter the filter or the engine.
In theory, you should be able to stop a leak from the switch threads without any thread sealer because of the tapered threads.
But thread sealer of some type (Loctite, plumbing pipe dope or other) is suggested.
Keep in mind that any thread dressing applied will pre-load the torque needed.
So be sure to back down on final torque when using thread sealants.
If the switch cracks the filter housing
If you used the proper torque and it still leaks oil, you may need to pull the switch and filter and look for a crack in the housing.
Pull the switch and the filter so you can see both the housing and the hole threads.
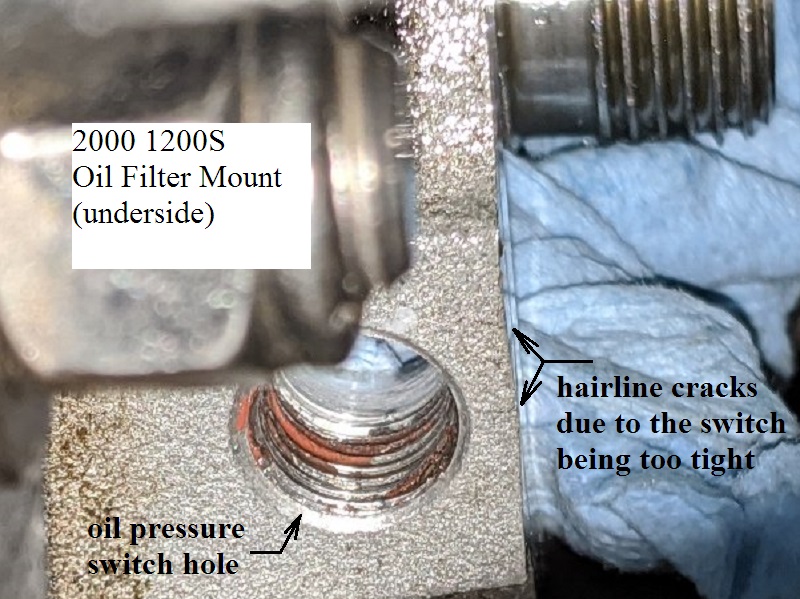
It only takes a little more than needed to crack the housing.
The switch threads are tapered. Turned too far in, the taper widens the hole and expands the aluminum around the hole.
The hole is near the end of the filter pad.
With little surface area between the hole and the end of the housing, that is the weakest part and where cracks will appear.
If yours has cracked, it'll need to be welded. The crack will only get worse with vibration.
The thing about welding is it causes warp-age. Once it's welded, the threads for the switch will probably need to be reconditioned as the hole may warp.
If so, you can try and chase the threads with a tap.
You may have to go with a threaded bushing (bigger threads into the housing with smaller threads on the other end) to add the switch back.
Also the main purpose for the filter pad is the machined flat surface for the filter.
It will need to be checked for flatness after welding so the filter don't leak.
The no weld version is: 2)
Clean the crack thoroughly with brake cleaner or contact cleaner. Screw the pressure switch in to open up the crack and clean it some more. It's gotta be CLEAN.
Remove the switch and apply 290 Loctite (no substitutes) to the pressure switch threads and hole and screw in the pressure switch.
After the switch in in place apply 290 Loctite to the crack so it can wick into the crack.
Cross your fingers while the Loctite cures.
Loctite 290 is a thread locker you apply to the fastener after it's been installed and tightened and it's used to seal cracks and/or weld porosity.
Also check the threads in the hole.
Too much torque will damage aluminum threads pretty fast and to different degrees.
Clean the filter mount surface and verify there is no crack and then inspect the threads for the switch.
The thread pitch in the housing is 1/8“ NPS (non tapered). You can run a tap into the threads and try to straighten them if needed.
Cracked:
This filter housing was cracked due to too much torque being applied while tightening the oil pressure switch.